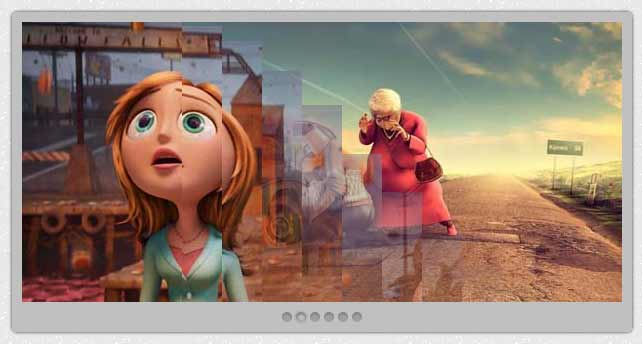
Today I'm sharing another awesome, beautiful image slider for Blogger/ BlogSpot blog. It is made with jQuery. and of course HTML and CSS but the main awesomeness, sliding effect is made with jQuery. This image slider is created by dev7studios.com/nivo-slider/. They did really a great job. This slider have downloaded more than 20,00000 times from their site. I have made a bloggerized version of the slider. See demo below.
Lets Step forward to adding this jQuery Image Slider to Blogger
1. Go to Blogger Dashboard > Layout > Add a Gadget
2. Select HTML/Javascript
3. Copy the code below and paste on it.
2. Select HTML/Javascript
3. Copy the code below and paste on it.
<style type="text/css">
/* dimpost.com - Basic Style */

#pagewrap {
    margin: 10px auto;
    padding: 0;
    position: relative;
    height: 400px;
    width: 640px;
}

#slidewrap {
    position: absolute;
}

#slider {
    border-color: #c0c0c0;
    border-radius: 5px 5px 5px 5px;
    border-style: solid;
    border-width: 10px 10px 30px;
    box-shadow: 0 0 3px #2F2F2F;
    height: 280px;
    margin: 10px;
    position: relative;
    width: 600px;
}

#slider images {
    position: absolute;
    top: 0px;
    left: 0px;
    display: none;
}


/* The Nivo Slider styles */

.nivoSlider {
    position: relative;
}

.nivoSlider images {
    position: absolute;
    top: 0px;
    left: 0px;
}


/* If an image is wrapped in a link */

.nivoSlider a.nivo-imageLink {
    position: absolute;
    top: 0px;
    left: 0px;
    width: 100%;
    height: 100%;
    border: 0;
    padding: 0;
    margin: 0;
    z-index: 6;
    display: none;
}


/* The slices and boxes in the Slider */

.nivo-slice {
    display: block;
    position: absolute;
    z-index: 5;
    height: 100%;
}

.nivo-box {
    display: block;
    position: absolute;
    z-index: 5;
}

.nivo-directionNav {
    display: none!important
}

.nivo-html-caption {
    display: none;
}

.nivo-caption {
    position: absolute;
    right: 20px;
    text-align: center;
    top: 130px;
    width: 192px;
    z-index: 60;
}

.nivo-caption p {
    margin: 0
}

.nivo-caption .title {
    font-style: italic
}

.nivo-controlNav {
    bottom: -23px;
    display: block;
    height: 15px;
    left: 204px;
    position: absolute;
    text-align: center;
    width: 192px;
    z-index: 51;
    opacity: 0.6;
}

.nivo-controlNav a {
    background: transparent url(http://project.dimpost.com/image-slider/images/button.png) no-repeat center center;
    display: inline-block;
    height: 14px;
    width: 14px;
    text-indent: -9999px;
    cursor: pointer;
}

.nivo-controlNav .active {
    background: transparent url(http://project.dimpost.com/image-slider/images/button_active.png);
}
</style>
<script src="http://project.dimpost.com/image-slider/jquery-1.6.1.min.js" type="text/javascript"></script>
<script src="http://project.dimpost.com/image-slider/jquery.nivo.slider.pack.js" type="text/javascript"></script>
<script type="text/javascript">
$(window).load(function() {
    $('#slider').nivoSlider();
});
</script>
<div id="pagewrap">
    <div id="slidewrap">
        <div id="slider">
            <a href="http://dimpost.com/" target="_blank"><img alt="" title="#caption1" src="http://project.dimpost.com/image-slider/images/sample0.jpg" /></a>
            <a href="#" target="_blank"><img alt="" title="#caption2" src="http://project.dimpost.com/image-slider/images/sample1.jpg" /></a>
            <a href="#" target="_blank"><img alt="" title="#caption3" src="http://project.dimpost.com/image-slider/images/sample2.jpg" /></a>
            <a href="#" target="_blank"><img alt="" title="#caption4" src="http://project.dimpost.com/image-slider/images/sample3.jpg" /></a>
            <a href="#" target="_blank"><img alt="" title="#caption5" src="http://project.dimpost.com/image-slider/images/sample4.jpg" /></a>
            <a href="#" target="_blank"><img alt="" title="#caption6" src="http://project.dimpost.com/image-slider/images/sample5.jpg" /></a>
        </div>
    </div>
</div>


Hi there, would it be possible to add a text link on a gradient background to this slider? Something similar to the JavaScript slider but where the caption is an actual (target-black) link. Also, I need to resize images and I see that doesn't seem to be an option in the code.
ReplyDeleteMany thanks
Welcome @alfredot, You have to add the caption with your own html and css. Or you can use this javascript slider
DeleteThere is a good news for you, I'll post a new jQuery Slider with your requirements... keep in touch.
Thanks - Admin
it not working
ReplyDeletePlease tell more specifically about your problem otherwise I couldn't help you.
DeleteI'm waiting to her from you..
Thanks -Admin
it doesn't work. Do i have to do something with the downloaded file? the jquery file?
ReplyDeletejQuery script, and nivo slider script is already added in the slider code. your problem may solve.. thanks
Deletehow can you edit so that the slider ONLY shows up on the homepage?
ReplyDeleteA nice and tricky question you asked...
Deletewell you can do that with a single line blogger conditional code. as like...
Option - 1: In this way you have to add the code directly into template.
------------
<b:if cond='data:blog.url == data:blog.homepageUrl'>
SLIDER CODE HERE
</b:if>
______________________
Option - 2: You can add the slider into widget.
--------------
<b:if cond='data:blog.url != data:blog.homepageUrl'>
#HTML1 {
display: none;
}
</b:if>
--------------
[here #HTML1 is a example, find your slider widget id and use like this way.]
Thanks - Admin
Hello, I'm having problems with this. I tried to tweak the code to match the dimensions and layout i want. But whenver the page refreshes, the photos make a mess in my whole homepage abut gets back in place after a few seconds. Here's the link.
ReplyDeleteI can't paste the code here though. I may have done something wrong with the code. Sorry if I sound like a damsel in distress. :))
ReplyDeleteadd a "overflow: hidden;" rule to your slider widget css.
ReplyDeleteor use it
#slidewrap {
position: absolute;
overflow: hidden;
}
instead of -
#slidewrap{position:absolute;}
Re: spilling photos.
ReplyDeleteAWESOME! IT WORKED! Thank you so much!
Hi, how can I resize the images that they fit into the slider? What are the dimensions? Its displaying too big.
ReplyDeleteImage dimension is 600x280PX. Use any size of image. For resizing I recommend Photoshop.
DeleteAnd then also change the width, height from here -
#pagewrap{
height:400px;
width: 640px;
}
#slider {
height: 280px;
width: 600px;
}
Hi are there any codes that i can use so that i can put in a link to each individual image in the image slider so that users can be redirected to the respective links?
ReplyDeletemany thanks.
Hi there, is it possible to change the sliding effects?
ReplyDeleteHello, the code works great. However I can not seem to center the slider under my header logo. It seems to place it too much to the right
ReplyDeleteone more: is the anyway to change the duration of how fast the image changes to the next? right now its set to 1 second or so
ReplyDeleteCan I add some text along side the images? Please share the tips, I'm not so good in coding. :-?
ReplyDeleteMate, the images appear like a list not like a slide. Give me a hand please.
ReplyDeletethank (o)
ReplyDeletehi..I added this to my blog http://haderali.blogspot.com/ but you can see that it is not working..all the pics showing separately on page instead of slideshow..
ReplyDeleteplease please help me about that..how can i fix that error
Hi! Where are the little round nav buttons at the bottom of the slider? They don't show up even in the demo. :/
ReplyDeleteWorks great! Thank you!
ReplyDeleteIs there a way to adjust the speed of the slider? I need to slow it down.
ReplyDeleteYou need to edit the jquery.nivo.slider.pack.js script at the following line
ReplyDeleteanimSpeed:500,pauseTime:3000
Admin, I don't see that in the script anywhere.
DeleteLook at the last line of the script(http://project.dimpost.com/image-slider/jquery.nivo.slider.pack.js)
ReplyDeleteDone, thanks :)
Deleteits not working..
DeleteI have edit the jquey but, still can not work..
These are really awesome, can i use two on the same blog
ReplyDeleteyou are amazing,works perfect,thank you so much
ReplyDeletethanks alot for htis..
ReplyDeletehow to resize the slider, I need width 960px and height200px
ReplyDeletehow to aligned center ????
ReplyDeleteReally Nice Work
ReplyDeleteHow do I change the slider speed?
ReplyDeleteHow do I edit the jquery.nivo.slider.pack.js?
ReplyDeleteHow can I change the speed of the slider?
ReplyDeleteI need to make the images exactly fit that PX size for them to work don't I?
Thanks
thanks,, it's working...
ReplyDeleteHi Admin, its working for my blog very well , thanks in advance
ReplyDeletebut are there any way to add text on the picture ... such as a sentence at the side of the picture but every picture with different text. Are there any way? Thanks
Hi! Is there a way I can place this widget on a blog post? I can only add widget on my sidebar. I tried placing the codes on the HTML on the blog post, but it doesn't work. Hope you can help me. Thank you!
ReplyDeletehow can i adjust the slider speed i cant find the pause time line in my code
ReplyDelete